

There are a ton of tutorials out there with great instructions on making a homemade goat milking machine. I won’t get into all of the details since all of that is already available, but I’d like to share some photos of my homemade goat milk machine along with some tips on problem-solving the issues I had and what I would do differently.
First things first. I based my milk machine on the one in this very nice video tutorial on youtube. www.youtube.com/watch?v=aK2JsEWwMEs Thank you, goatfinder. This was super helpful.
The basic idea here is to create low pressure in the jar by sucking air out of it through one tube, forcing the milk to flow into the jar through another tube. The air line side and the milk side are completely separate – the milk never goes through the pump, and never touches the air line side [Unless you’re like me and accidentally fill the jar to the tippy top, causing milk to flow into the airline side creating a huge mess. But I digress…]
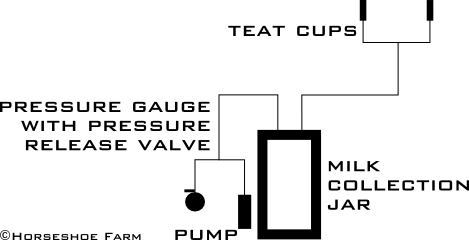
My changes to the milk machine in the video include adding dual cups to milk both sides of the udder at once and a battery powered pump. I also used different connectors because I couldn’t find the ones in the video. Here’s a quick sketch of how this thing is put together:
I believe my total cost came in at under $75. Here’s a rough list of the materials I used and estimates on my costs…I built this about 6 months ago, so I’m going from memory.
Supplies:
- Wide mouth ball jars and lids. I’m milking nubians and use 1/2 gallon jars, and sometimes quart jars for overflow. (approx. $15 for 6 1/2 gallon jars).
- A food saver battery powered pump. I found the pretty red one at Target. (approx. $20) Any type of air pump should work as long as tubing will connect to it. I’m thinking about upgrading to something with a foot pedal to keep my hands free.
- A pressure gauge with a pressure release valve. I’ve used a brake bleeder from Auto Zone. I think it was approx. $35
- Airline Tubing. I’ve used 1/4″ tubing for the air pump side, and something silly like 7/16″ for the milk side. I needed something bigger than 1/4″ for the milk or it backed up, but not larger than 1/2″ so it fit tightly on the syringe. 3/8″ probably would have been a better choice, and should offer more options when it comes to the connection parts. I got my tubing at Home Depot. It was cheap. ($5-ish?)
- Connections for the tubing. I used some brass plumbing parts and some landscape irrigation parts from Home Depot.
- One 1/4″ tee. I found this in the landscape irrigation section. This goes on the air side, so the milk never touches it.
- One tee the size of the larger milk tubing. Since the milk passes through this, I wanted something food-safe. I used a barbed brass plumbing part.
- Something to connect both the airline and milk line to the jar lid. I used brass connectors that were barbed on one side for the tubing to slip onto and threaded on the other side for a washer and nut. I used the washers and nuts on the inside to sandwich the jar lid.
- Rubber washers. I used a washer between the brass connector and the jar lid to help keep it air tight. I’m not sure it helps.
- Silicone. I picked up a small tube of silicone caulk to make the connections from the tubing to the lid air-tight. ($5-ish)
- Teat cups. I used 60cc syringe housings – obviously WITHOUT the needle. On my first round, I picked up the kind that a needle screws onto. Trying to get the tubing to stay securely attached and airtight was VERY problematic. I found these syringe tubes with a pointy tip, presumably for giving oral medications, and they work great. I just shove them into the tubing until they’re tight, then pull them back out for cleaning. (photo below) I saved the plungers for checking air-tightness and plugging up one side if I need to.
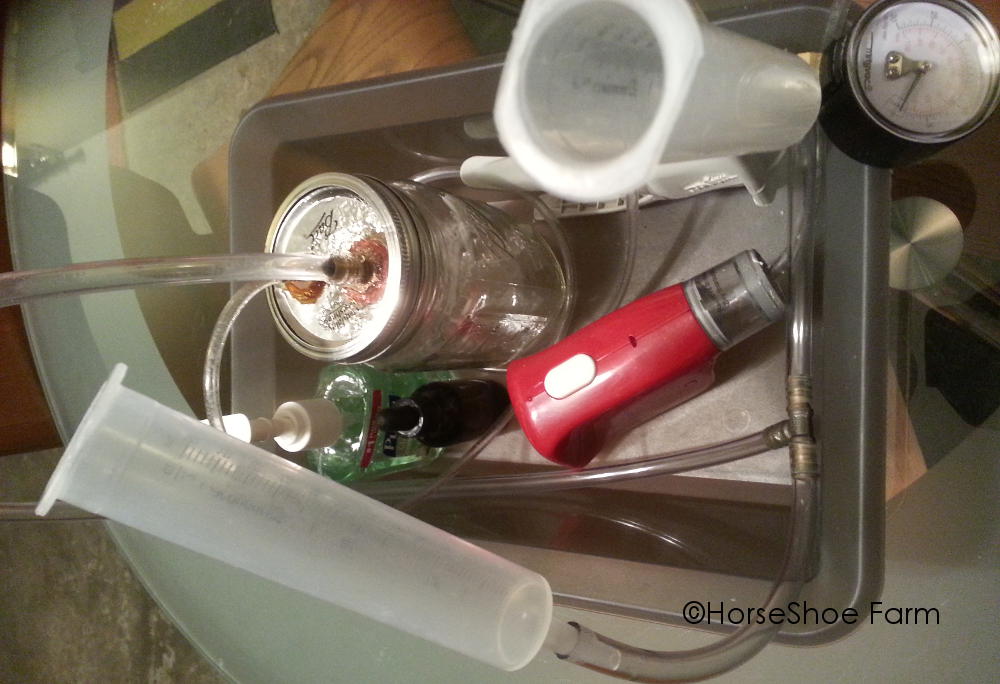
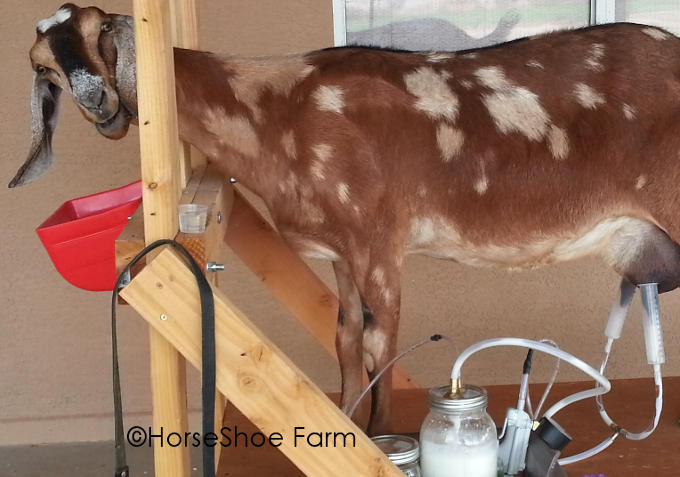
Here are a couple photos of my milk machine all assembled.
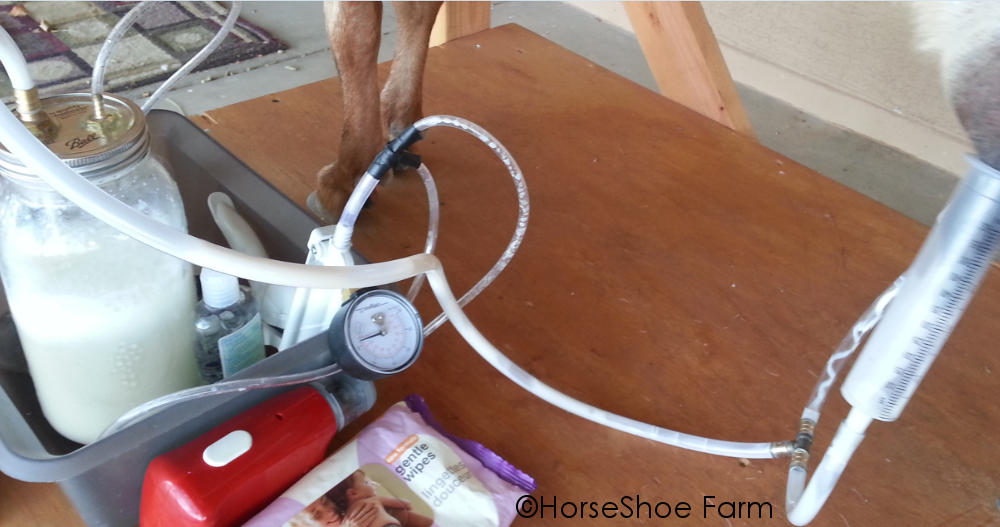
See the clear plastic round part on the red pump above? I drilled a little hole in the top (which is flexible rubbery material) and shoved my 1/4″ airline tubing in there. Oh, the cute little bin I keep everything in is from IKEA. It makes carrying it all in and out easy, and I can keep my hand sanitizer, dip, paper towels, and oils in there, too.
Here is the syringe tip that seems to work best for me:
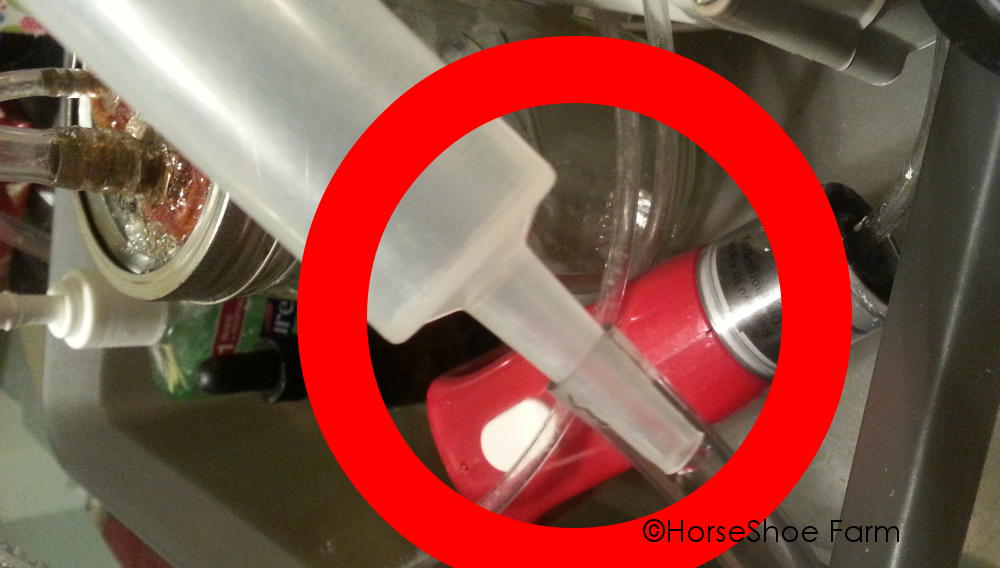
It’s important to take these off for a thorough cleaning after every use because milk gets between the syringe and the tube.
This is the barbed brass tee I’ve used to go from the tubing that comes out of the jar to the two splices of tubing that hold the teat cups:
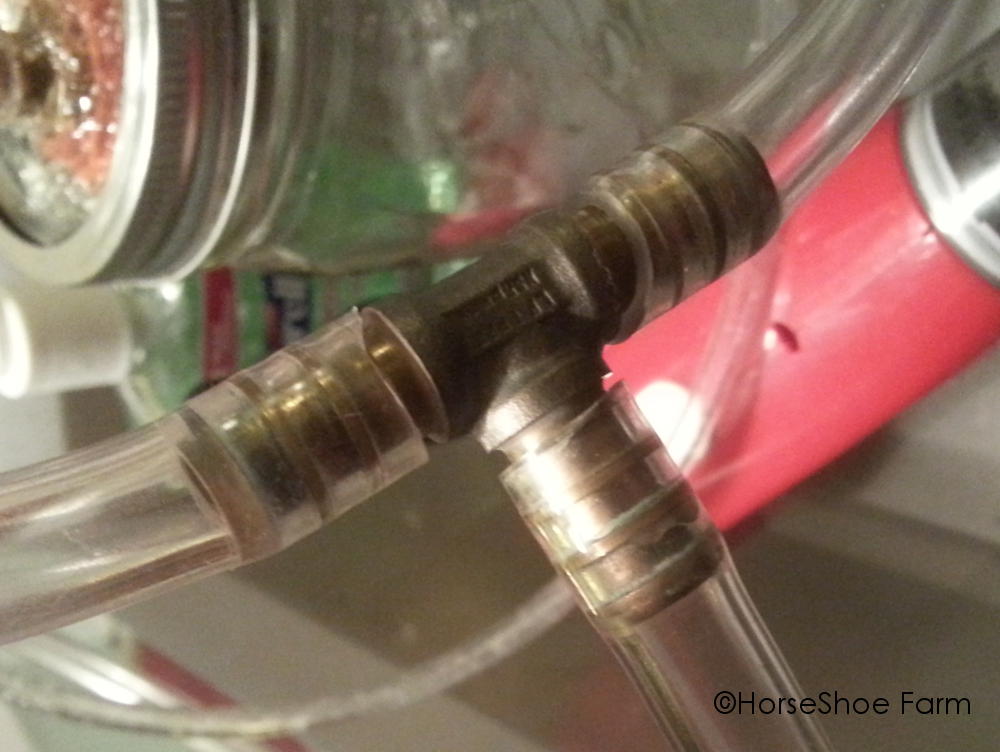
There is also a 1/4″ tee on the air line side going from the jar to the pump and the brake bleeder/pressure gauge and release. The brake bleeder came with its own tubing that slips right over 1/4″ tubing and onto the tee and stays air tight that way.
I’ve used this barbed-on-one-side threaded-on-the-other-side brass part to secure the tubing to the jar lid. The reddish-orange thing is a rubber hose washer / o-ring to help keep things air tight:
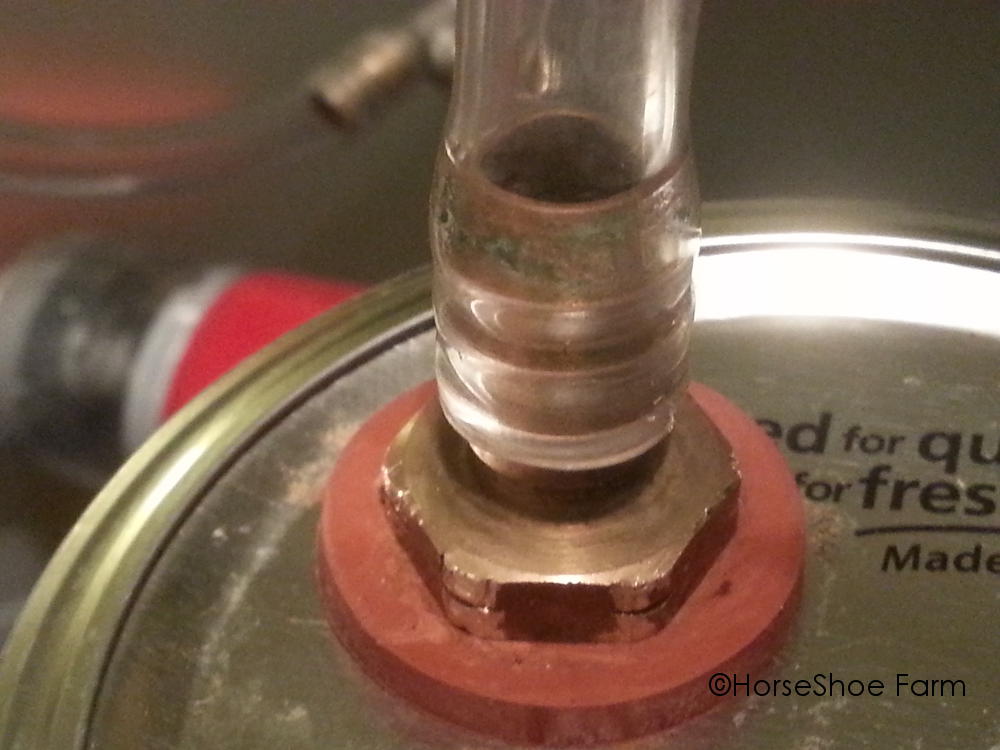
I could not get this system to hold pressure without adding silicone around the connections to the jar lid. It looks super messy, which drives me crazy, but since the milk doesn’t touch it, I’m dealing. If you ever work with silicone, WEAR GLOVES. Silicone doesn’t wash off. It also does not wash out of your hair. You’ve been warned.
There you go. All done and functioning as good as can be expected from a milk machine that costs less than 1/10 the price of a professional one. : ) Buttercup prefers the machine to being hand milked. I’m not sure if that speaks to the quality of the machine or my lack of skill and experience hand milking. Either way, I’m glad we agree. I like the machine better, too.
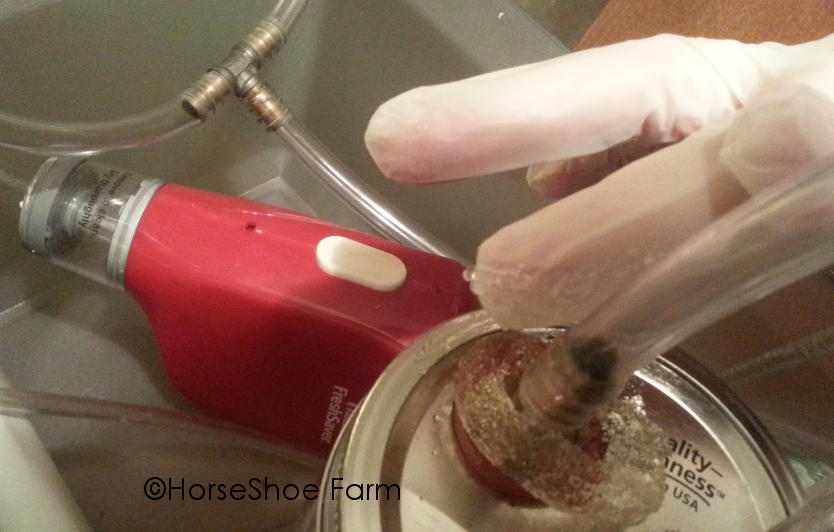
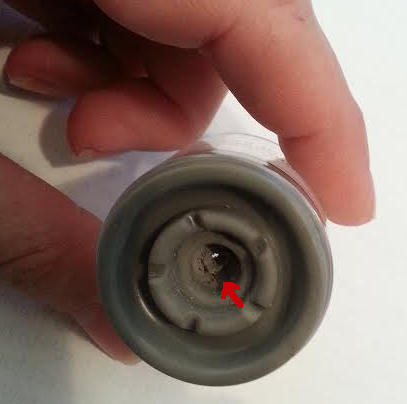
Update: Here are some photos of the connection between the tubing and the air pump.
The pump has a removable plastic cap with a rubber top. I drilled a small hole in the rubber – slightly smaller than the tubing – so it was pretty difficult to push the tubing through the hole. This created a tight seal that held up well for quite awhile. See the tiny hole by the red arrow? I used a small drill bit to start it, then gradually increased the hole size until I could squeeze the tubing through.
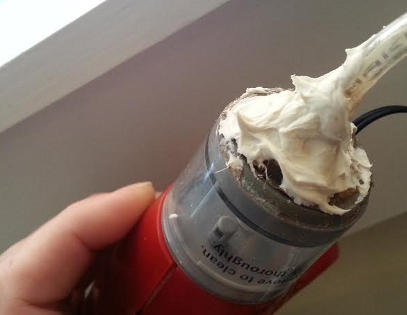
After some time, it started leaking so I added a big gob of silicone caulk between the tubing and the rubber. It doesn’t look pretty, but it works.
Troubleshooting
- I’m having trouble with the seals on the jar lid. I’ve had to remove the silicone and re-do it twice in six months. I’m on the hunt for a plastic jar lid to see if the silicone maintains a better seal with that. When I find one, I’ll let you know how that goes.
- Thanks to trial and error, I now own pretty much every size livestock syringe known to man. It seems the ideal teat cup size is something that allows about 1/4″ to 1/2″ gap all around the teat. One of my girls has larger teats than the other and it’s a tight squeeze into these 60cc syringe housings, which are the largest I can find. She milks much slower with this machine, but hand milks the same or faster.
- My girls milk at about 5 PSI or less. I’m super careful about watching the pressure on the gauge so I don’t hurt my goat. I put this on my arm and pumped it up to about 10PSI just to see what it felt like. It didn’t feel good that high. I keep the pressure at the lowest possible that keeps the milk flowing. If the milk stops, taking the cups off, hand milking a few squeezes, then putting them back on usually helps. I use the pressure release button on the gauge to release the cups.
- From time to time, I push the button on the pump and the pressure stays at zero. Here’s my problem solving order:
- Check the jar lid to make sure it’s on straight and tight
- Put the plungers into the syringe housings and see if it’s holding pressure that way. If so, my issue is with the cup-to-goat connection. I hand milk some, and try again.
- If it’s not either of those, there’s a connection problem. I start duct taping all of the connections until I find the problem. It’s usually a leak in the silicone at the jar lid.
Have you made your own milk machine? If so, I’d love to hear how it’s working for you! I’d also love any feedback on things I can do differently to improve the system (eg: different pumps, teat cups, etc).
Thanks for reading, and Happy Milking!

I have made and used brake bleeder style pump. I recently bought the food saved pump. My question is: How do I attach the tubing to the vacuum pump?
You’ll need to get a T to split the tubing. Attach the T to the end of the tubing coming off your jar and add a piece of tubing to each end of the T. One side goes to your brake bleeder – this is used as your pressure gauge and release – and the other end of the T goes to the pump. I cut a small hole in the rubber top of the plastic cap on the pump, pushed the tubing through the hole, then sealed with a bead of silicone.
How do u get a good connection with the hose to the foodsaver? Could you show a picture?
Thanks in advance,
Dana
I added some photos for you, Dana. I hope this helps!
I have a Food Saver pump and I used a 1/4 to 1/8 barbed plastic reduction coupler to attach the air hose. The 1/8th barb fits tightly into the tiny hole in the Foodsaver. And the 1/4 side fits perfectly onto my hose. I then run the hoses through the jar lid through 1/4 inch inner diameter rubber grommets with a little bit of food grade silicone around the inside between the grommet and the lid. The 1/4 hose I use fits tightly with a good seal. Less parts and less cost to make.
The plastic barb is a great idea! Thanks for sharing. That sounds much easier than using silicone on that part.